Welcome to Art for Beginners:TIPS
The tips page is gonna teach people giving some tips I learned throughout the years making my own artwork.I'm showing off the three projects I've made throughout my school years not only drawing but also showing two photoshop projects and one drawing I felt the most proud of.I'm showing a scannography project I made earlier back in September of this year,a third project I did on a state earlier this year and I'm also showing a drawing I made of the human eye.
TIPS: SCANNOGRAPHY : HARMONY OR DISCORD
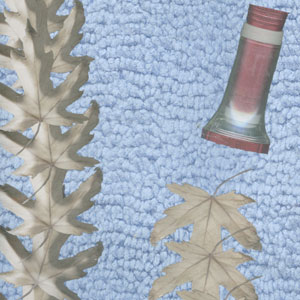
The tips I remember doing for this the scannography was we had to certain objects that represent fabric or cloth material,fall,a man-made object and a object that's 3 dimensional.The objects I used were a cloth,a leaf I found and a flashlight since I thought these would be the perfect used to show the image represents like it's gonna be telling a story.I thought of my scannography project as a camping adventure which later went to a mystery.
My tips for making a scannography especially given the objects that are required it's just making your own story kind of which is what the image talks about.
Another important part for a scannography the way I was taught have the right color options,putting certain objects in the appropriate places.erasing certain parts on each object,also how I made many copies of the leaf it's using the duplicate tool which means making a copy of a layer you select and how I made one side of leaves dark compare to the other was blending them because I thought with another side light and the other dark it represent a certain time of day whether it's bright in the day or dark at night.
The final part is just sizing the image depending how big you want it.Make sure the image is clear quality to represent either a certain theme whether it's harmony or discord.And putting your name at very bottom but it's gotta be readable for people to see.
TIPS : THE HUMAN EYE
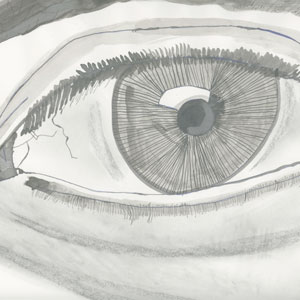
The tips I remember doing for this project was using certain numbered pencils each of them represent either the lightness or darkness on each pencil you use,I used a mixture of both light and dark pencils to give make a shadow showing it off along with a little bit of charcoal for the drawing I used a mixture of Chiaroscuro.And I also used ink for the linings of the eye along with the eyebrow.
My tips for drawing a human eye would be pick the perfect camera shot as if you are posing for a picture whether it's taking a selfie or someones your takes the picture of you,once the image is taken you can zoom in on your face and try to recreate your own eye,have the appropriate pencils to start drawing,an option would be going into detail on the eye making it look more realistic and taking time I took time put the linings around the eye,charcoal in the white of the eye and even the bag under the eye sometimes eyes do have bags.And also using both two different versions of ink one with a pen dipped in ink and ink in water to give the gray effect for both the eye and eyebrow.
Another important part for making the human eye is also a little bit of shadowing if you want to have a shadow on the drawing it's using a little bit of charcoal and a paper towel a little bit of it only because you don't want to go overboard with shading your drawing don't make it too dark try to make it easier.My experience with drawing the human eye was similar to when I later made the expressive self portrait.
The final part is just sign your own name in your own style to show people you've made the drawing and I think people will really appreciate what message the drawing represents.

TIPS : THE VACATION COLLAGE
The tips I remember doing for this project was started out with a drawing.I decided to do my collage project on Texas when I did presentation of I talked many places or a personal talent of mine I started with vacations first I visited places when I was a kid or even today I did my drawings which started out as sketches I drew vacations from when I went to Oregon,Florida,Texas and the final one was a personal talent of mine which is drawing I explained to digital design class earlier this year.
My tips for recreating a state in a collage is finding the outline of a state,a background and objects that belong to that state.I found a image of the state outline,blue sky since I think Texas has tons of it,an image of a bull and rattlesnake since Texas has a lot of farming and snakes up there when I went.Starting with making a new file for photoshop putting the image of a state outline,next putting in the blue sky image there's two options for that one erasing the outside edges of the sky where it sticks out of the state or an image outline which might be able to take the outer edges.When I made the snake and bull images for my project I clicked on both layers used the eraser tool and shrunk it down multiple times because you don't want to cut down edges of either animal.
Another important part for making the project was the sun that's in the image.Now the sun I made entirely myself mostly by using the circle tool,colorizing it and also giving a gradient look along with distorting the rays around the sun because it's super hot usually in Texas.
The final part is just sign your own name in your own style to show people you've made on photoshop since collages the way I made them are originally done. I didn't get to put my name on it because it was a requirement that our teacher wanted students to save the files for our third project of anything as our full name and a jpg file and also when I presented to the class I think some people really appreciate what message of the project represents by putting objects that belong or represent the state.Some people thought my design of recreating Texas was good and that it could be on a t-shirt.